Maintenance & Cleaning
Garbage Disposal Gasket and Splash Guard Replacement
Affiliate disclosure: some links on this page go to Amazon, and we may earn a commission if you buy through them. That never changes the repair advice below or the order we recommend the steps in. Details.
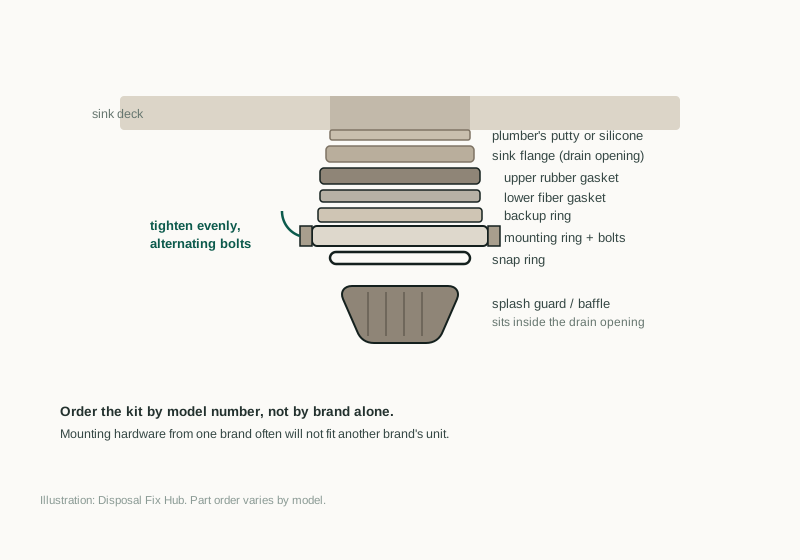
These are two separate repairs that get lumped together because the parts sit within an inch of each other. One fixes a smell or a torn baffle. The other fixes a leak at the drain opening. Doing the wrong one wastes a Saturday.
Identify the part before you order
Find the rating plate on the side or bottom of the housing. It carries the model number, and that number is the only reliable way to buy the right baffle or flange. Write it down and photograph the plate; listings are easier to match with a picture in front of you.
Then identify the mount. InSinkErator Badger and Evolution units use Quick Lock. Waste King Legend units use EZ Mount. These mount designs are not interchangeable without an adapter, and a baffle sold for one family may not fit another. Check exact model compatibility and inspect the existing hardware. If you are unsure, the brand guides describe the differences, with separate pages for Badger, Evolution, and Waste King.
The parts involved
| Part | What it fixes | Notes before ordering |
|---|---|---|
| Splash guard (baffle) | Torn flaps, hardened rubber, odor that returns after cleaning | Order by model number; on some units the baffle is bonded to the flange and cannot be bought separately |
| Sink flange and gasket kit | A leak at the drain opening, rusted flange, failed putty ring | Kits usually include the flange, rubber gasket, and fiber gasket; check whether putty is included |
| Plumber's putty or silicone | The seal between flange and sink | Putty for stainless steel; silicone for composite or granite sinks, where oil-based putty can stain |
| Mounting assembly | Rusted, stripped, or cracked mount; a unit that will not stay tight | Must match the mount family; sold separately from the disposal |
| Hose clamp | A drip at the dishwasher inlet | Cheap; replace it any time you have the hose off |
Safety first
Switch the disposal off at the wall, then unplug it or kill the breaker. A disposal is heavier than it looks and is full of water and food residue, so support it before you loosen the mount. Wear gloves: the flange edges and the grind ring are sharp.
Job one: replacing the splash guard
-
Remove the old baffle
The baffle sits inside the sink flange, held by an outer lip. With the power off, grip the outer edge — not the flaps — and work it upward. If it has bonded to the flange with grease and scale, warm soapy water and a plastic scraper will free it. Do not use a knife against the stainless; a scratch there becomes a leak path.
-
Clean the flange
Wipe out the ring of film that the old baffle was sitting on. This step determines whether the new guard seats properly. A dry, clean flange lets the lip lock in.
-
Seat the new baffle
Press it in evenly, working around the circle so the outer lip tucks under the flange rim. It should sit flat with no gaps. If it will not seat by hand, it is the wrong part; forcing it means it will pop out on the first load and may jam the disposal.
-
Test it
Run cold water through the sink and watch for splashing back through the flaps. Then grind a small amount of soft food and confirm nothing rides up over the rim. A baffle that lifts under load is not seated.
If the baffle is molded into the flange
Some units bond the rubber directly to the flange. There is no separate baffle to buy; the part you need is a new sink flange, and often a complete mounting assembly. Confirm this before ordering, or you will end up with a part that cannot be installed.
Job two: replacing the sink flange gasket
This is the repair for a leak at the drain opening — water tracking down the outside of the flange onto the cabinet floor. If the water is coming from the bottom of the housing instead, stop: that is an internal seal failure and no gasket will fix it. The leak guide explains how to tell the four leak points apart.
-
Shut off power and prepare
Switch off at the wall, unplug or kill the breaker, and put a bucket and towels under the trap. The unit and the trap will both hold water.
-
Disconnect the drain and dishwasher hose
Loosen the slip nuts on the drain outlet by hand and pull the pipe clear. If a dishwasher drains into the disposal, release the clamp and remove the hose, keeping it elevated so residual water does not run out. Note which fitting went where; a photo helps.
-
Support the unit and remove it
A disposal is heavy enough to strain a wrist and awkward enough to drop on a foot. Have a helper or a sturdy box at the right height. Release the mount — three bolts on a three-bolt assembly, a twist on Quick Lock and EZ Mount — and lower the unit rather than letting it hang by the plumbing.
-
Remove the old flange and putty
From above the sink, lift the flange out. The old putty ring will be hard and brittle. Scrape it with a plastic scraper, then clean the sink opening with warm soapy water. Inspect the opening for cracks or a distorted rim; a cracked sink will not seal no matter how much putty you use.
-
Apply the new seal
Roll plumber's putty into a rope about the thickness of a pencil and wrap it under the flange lip. On a composite or granite sink, use silicone instead, because oil-based putty can stain the surface. Do not overdo it — a thick ring squeezes out into the sink bowl.
-
Seat the flange and reassemble
Press the flange into the opening and center it. From below, install the rubber gasket and the fiber gasket in the same order they came off, then the mount. Hang the unit and tighten the mount evenly, alternating sides rather than cranking one bolt tight. Snug plus a firm turn is enough; overtightening can crack a thin sink and squeezes the seal dry.
-
Reconnect and leak test
Reattach the drain outlet and the dishwasher hose, then dry the whole area with a towel so any new water is obvious. Fill the sink, pull the stopper, and watch the flange, the slip nuts, and the dishwasher inlet. Run the disposal briefly with cold water and check again. A drip at a slip nut usually means a cross-threaded or missing washer, not a failed seal.
Ordering advice
Buy by model number, not by photo. A baffle that looks identical can differ in diameter by a fraction of an inch, and that fraction is the difference between a seal and a leak. If a listing does not state the model compatibility, look for the manufacturer's parts page or contact the seller before you order.
Buy the kit rather than individual gaskets when you are already doing the flange job. The rubber and fiber gaskets are cheap, and reusing an old one that looks fine is how a repair turns into a second leak. Keep the receipt and check the return window; parts for older models are sometimes mislisted.
If the mounting hardware is rusted or the snap ring will not hold, replace the whole mount while the unit is off the sink. Doing it later means taking everything apart twice. The installation guide covers the full reassembly sequence if you end up going that far.
FAQ
Can I replace just the rubber baffle?
On most units, yes — it is a separate part that lifts out of the flange. On some models the baffle is bonded to the flange, so the flange is the replacement part. Check your model before ordering.
Putty or silicone for the sink flange?
Plumber's putty is traditional on stainless steel sinks. For composite, granite, or other porous sinks, use silicone, because the oil in putty can stain the surface around the drain.
How tight should the mounting bolts be?
Snug, then firm, tightened evenly around the circle. The goal is a compressed gasket, not maximum torque. Overtightening can crack a thin sink and forces the putty out of the seal.
The leak is at the bottom of the housing. Will a new gasket fix it?
No. Water at the bottom of the housing means the internal seal between the motor and the grind chamber has failed. That is a replacement, not a gasket job.
Parts and tools mentioned
Affiliate links · price ranges are approximate street prices
Splash guard / baffle
Order by model number. Generic baffles fit poorly and can rattle or leak splatter.
Sink flange gasket kit
Includes the flange, putty ring, rubber gasket, and fiber gasket needed to reseal the drain opening.
Mounting assembly
Replace rusted or stripped mounting hardware without buying a whole new disposal.
If you buy through a link on this page, Disposal Fix Hub may earn a small commission at no extra cost to you. We link to parts and units we would use ourselves, and the repair steps above work whether or not you buy anything. Read the full disclosure.
Sources & review notes
Review focus: match parts by model number and preserve the manufacturer’s flange and mounting-stack order.