Maintenance & Cleaning
How to Unjam a Garbage Disposal With an Allen Wrench
Affiliate disclosure: some links on this page go to Amazon, and we may earn a commission if you buy through them. That never changes the repair advice below or the order we recommend the steps in. Details.
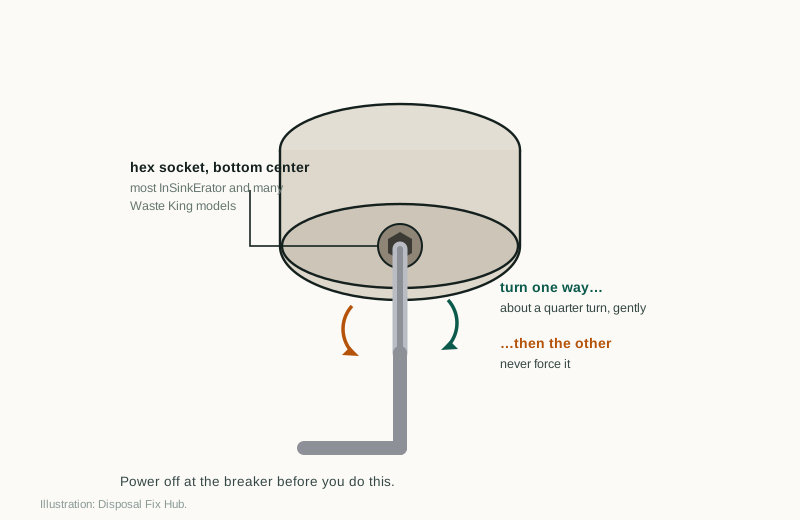
A jam is the most common disposal failure, and this wrench is the tool the manufacturer expects you to use. The job takes about ten minutes if you resist the urge to force anything.
What to have ready
You need less than you think. A flashlight matters more than any of it, because you will be working under a cabinet in the dark.
- A 1/4 in Allen wrench or hex key; a 5/16 in for some models
- A flashlight or phone light
- Long needle-nose pliers or tongs
- Old towels and a small bucket
- A second person, if you can find one — the cabinet is cramped
Safety first
Turn the disposal off at the wall switch, then unplug it or switch off its breaker. The wall switch alone is not enough: someone can flip it while your hand is near the opening. Never put your hand into the grind chamber, and never use a screwdriver as a jam tool.
Find the hex socket
Look at the bottom of the housing, at the center. On most InSinkErator units and many Waste King models there is a hexagonal opening, usually 1/4 in across, sometimes covered by a small plastic cap. On a few models it is 5/16 in. Some units have no socket at all, which is covered below.
The socket is part of the flywheel. Turning it turns the plate inside the chamber, which is how you break the bind without opening anything. If the socket is stripped or rounded, stop — a stripped socket means the flywheel has to be replaced, and in practice that means a new disposal.
The procedure, in order
-
Cut the power twice
Flip the wall switch off, then unplug the unit or turn off the breaker that feeds the circuit. If the cord is hardwired, the breaker is your only disconnect, so keep the panel open while you work and treat the circuit as live until both steps are done.
-
Insert the wrench fully
Seat the short end of the Allen wrench into the socket until it is all the way in. A partial insertion rounds the corners of the socket under load. If the wrench does not fit snugly, you have the wrong size — try 5/16 in rather than forcing 1/4 in.
-
Rock it a quarter turn each way
Apply steady pressure and turn the wrench about a quarter turn in one direction, then a quarter turn back. Repeat. You are trying to break the bind, not spin the flywheel continuously. Often the first movement is a fraction of an inch, and then it frees up suddenly.
-
Clear the chamber from above
Once the plate moves, shine the light down the drain opening and look for what caused the jam. Use long pliers to lift it out — a piece of peel, a bone, a utensil, a shard of glass. Keep your fingers outside the flange. If the object is visible but not grippable, work the wrench again and see if it rotates into reach.
-
Press the reset button
On the bottom or lower side of the housing, near the cord, there is a small red or black button. It is probably raised because the overload tripped while the motor was straining. Press it firmly once with your thumb until it clicks and stays in. If it pops right back out, the chamber is still jammed or the motor is still hot.
-
Restore power and test
Turn the breaker back on, then the wall switch, and stand back. With cold water running, feed a small amount of soft food and listen. A normal grind is steady and slightly gravelly. A hum with no movement means the jam is not cleared. A metallic grind that continues after the chamber is clear points to worn components, not food.
After the test, look under the sink. Working a jam can shift the drain connection, and a drip at the slip nut is easier to fix now than after it warps the cabinet floor. See the leak guide if you find water.
If your unit has no hex socket
Not every disposal has one. Some older units and a few off-brand models have a solid bottom and never included a service socket. You can still free a jam from above without opening the housing.
With the power off and the unit unplugged, shine a light into the chamber and use the handle of a wooden spoon or a length of clean wooden dowel. Press it against the outer edge of the plate — not the center — and lever the plate backward a quarter turn. Wood will not score the grind ring the way a screwdriver will. If the plate will not move this way, the obstruction is wedged hard, and the unit needs to come out or a plumber needs to look at it.
If the wrench will not budge
Stop pulling. A wrench that will not move under firm hand pressure is telling you something is wedged between the plate and the ring, and more force will either bend the wrench, crack the socket, or warp the flywheel. None of those outcomes is cheaper than a service call.
Go back to the chamber with the light and the pliers. If you can see the object, work at it from above. If you cannot see anything and the wrench still will not move in either direction, the jam is internal. That is the point to compare a repair quote with the price of a replacement; this cost comparison lays out the decision, and the installation guide covers what a swap involves. A unit already near the end of its service life rarely justifies a teardown.
If it jams again immediately
Two different problems look the same here. If the unit jams on the same load — the rest of the potato peels, the same plate of scraps — the object is still in the chamber or you fed too much at once. Clear it, then feed smaller amounts with more water.
If it jams on a normal, light load with a clean chamber, the cause is mechanical or electrical: a failing start capacitor, a motor drawing high current, or a unit that is undersized for the way the kitchen is used. Repeated trips after a proper clear-out are a replacement signal. The reset-trip guide separates an overload from a dying motor, and the reset button guide explains what the button is actually protecting.
One more thing to rule out before you replace anything: a rattle or scrape that started with the jam may be a foreign object that is still in the chamber but out of view. If the sound is new and persistent, see the rattling-noise guide.
FAQ
Can I use a screwdriver if I do not have an Allen wrench?
Not from below. A screwdriver tips into the socket at an angle, rounds the corners, and can punch through the housing. Use the correct hex key, or work from above with a wooden handle if your unit has no socket.
How long should I wait before pressing reset again?
Give the motor a few minutes to cool after a strain. Pressing reset immediately on a hot motor usually just trips it again, which tells you nothing about whether the jam is cleared.
Does the wrench have to be exactly 1/4 inch?
On most units, yes. Some models use 5/16 in. A wrench that fits loosely will round the socket, so try the other size before applying force. Never hammer a wrench into the socket.
What if the disposal still hums after I clear it?
The flywheel is still bound, or the motor has failed. Recheck the chamber with a light, then test the wrench again. If it turns freely but the motor only hums, the start circuit or windings are the problem and the unit is a replacement candidate.
Parts and tools mentioned
Affiliate links · price ranges are approximate street prices
1/4 in hex jam wrench
Longer than a standard Allen key, with a handle that lets you apply steady pressure instead of a sharp twist.
If you buy through a link on this page, Disposal Fix Hub may earn a small commission at no extra cost to you. We link to parts and units we would use ourselves, and the repair steps above work whether or not you buy anything. Read the full disclosure.
Sources & review notes
Review focus: use the bottom socket only when the model provides one, isolate power, and stop when the flywheel remains seized.