Troubleshooting
Garbage Disposal Leaking: Find the Leak Before You Replace It
Affiliate disclosure: some links on this page go to Amazon, and we may earn a commission if you buy through them. That never changes the repair advice below or the order we recommend the steps in. Details.
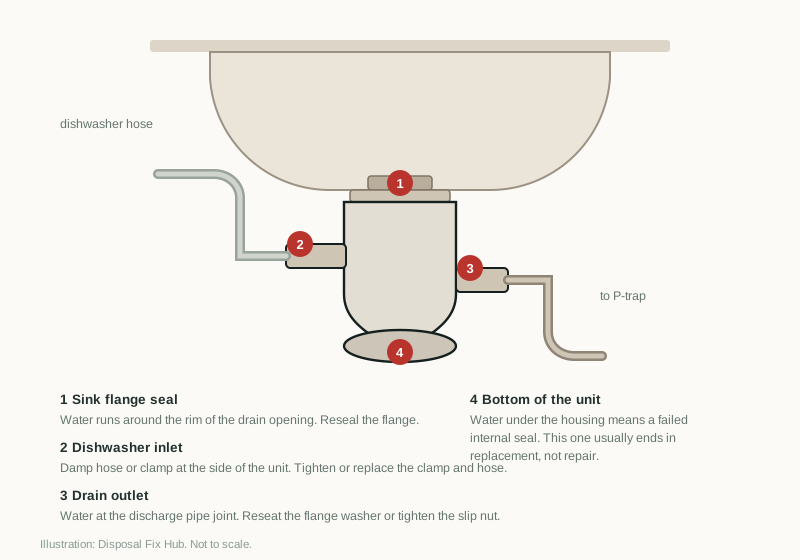
Do not start by tightening everything you can reach. Find the first drop, then fix the part that made it.
Safety first
Switch the disposal off at the wall and unplug it or trip its breaker before you put a wrench on any fitting. A leak can drip onto the cord, the outlet, or the floor where you are kneeling. Put a bucket and towels down and dry your hands before touching anything electrical. A disposal is heavy: support it with a board and a bucket when you take it off the mount, and never let it hang from the drain pipe.
The dry test: make the leak show itself
Water spreads sideways along a cabinet floor, so the puddle is rarely under the source. Dry everything, then add one variable at a time.
-
Dry the area and mark the joints
Wipe the housing, the pipes, and the cabinet floor until genuinely dry. Wrap a dry paper towel around the flange, the dishwasher hose clamp, and the drain outlet; the first towel to get wet is your leak.
-
Run cold water, no disposal
Run the tap for a minute and watch with a flashlight. A leak with the motor off is on the drain side: flange seal, slip nut, or trap. Wipe as you go to tell new water from old.
-
Run the disposal with the water on
Vibration is the difference. A joint that stays dry at rest but weeps while the motor runs usually has a loose slip nut or mounting bolt. Water at the side of the housing during this step points to the dishwasher inlet.
The four leak sites at a glance
Match what you see to the row, then read that section.
| Leak site | What you see | Fix | New unit? |
|---|---|---|---|
| Sink flange at the drain opening | Water ring around the drain, drips onto the housing, wet cabinet rim | Reseal with putty or silicone and fresh gaskets | Only if the flange is cracked |
| Dishwasher inlet | Water at the side, at the hose clamp, during a dishwasher cycle | Tighten or replace the clamp and hose | If the inlet is cracked |
| Drain outlet and slip nut | Drips at the discharge pipe, water running down the back | New flange washer, realign, tighten the nut | If the outlet tube is cracked |
| Bottom of the housing | Water pooling underneath with everything above dry | None. Internal seal failure. | Yes |
Leak 1: the sink flange at the drain opening
This is the most common disposal leak, and people misdiagnose it as a cracked housing because the water runs down the outside of the unit before it drips. Look at the sink deck first: a ring of moisture around the drain opening, or a drip from the sink rim, is the flange.
The seal is putty under the flange rim plus rubber and fiber gaskets below the sink. Putty dries out, the bolts loosen, or the installer skipped the putty. Resealing takes about an hour and starts with taking the unit off the mount.
-
Disconnect and support the unit
Power off, then disconnect the drain and dishwasher hose. Put a bucket and board under the unit so its weight is held before you release the mounting ring.
-
Remove the old seal completely
Scrape the old putty off the flange and the sink opening with a plastic scraper. New putty will not bond over the old, and the leak returns. Dry the opening thoroughly.
-
Apply a fresh ring of putty or silicone
Roll putty into a pencil-thick rope and press it around the underside of the flange rim. On a stone or composite sink, use 100% silicone instead, because putty can stain.
-
Reassemble the gaskets in order
Press the flange into the opening, then fit the rubber gasket, fiber gasket, and backup ring in the order your kit's diagram shows. Kits vary, and order matters more than torque.
-
Tighten evenly, then test
Snug the bolts in a star pattern, alternating across the ring, until putty stops oozing out. Overtightening distorts the flange and can crack a thin sink. Fill the basin, release it, and watch the rim for a minute. Silicone needs a full cure before it gets wet.
A flange kit is inexpensive, and gasket and splash guard replacement covers the job in detail. If the flange is cracked or pitted through, replace it rather than adding putty.
Leak 2: the dishwasher inlet on the side
Water at the side of the housing, usually only while the dishwasher drains, points to the inlet: a short tube with a hose held by a clamp. Three things go wrong: the clamp loosens, the hose hardens and splits, or the inlet cracks.
Dry the area, run a dishwasher cycle, and watch that one spot. If the clamp is loose, a screwdriver is the whole repair. If the hose is stiff or cracked at the end, replace it rather than trimming it back; a shorter hose strains the same joint. A cracked inlet is part of the housing, so the fix is a new unit. The dishwasher drain guide covers hose routing and the knockout plug.
Leak 3: the drain outlet, slip nut, and flange washer
Water at the discharge pipe behind or below the housing belongs here. The connection is a short tube, a tapered flange washer, and a slip nut. The washer only seals when it faces the right direction.
Hand-tighten the nut, then give it about a quarter turn with channel-lock pliers. More than that crushes the washer and can split the nut. If it still drips, take it apart: a hardened, flattened, or backwards washer will never seal, and a new one costs very little. Check that the trap is not pushing the pipe sideways, because constant strain reopens the joint. A cracked outlet tube ends in replacement.
Leak 4: water from the bottom of the housing
This one has a simple rule. If the flange, the side inlet, and the drain outlet are dry and water still gathers under the unit, the internal seal around the motor shaft has failed. There is no gasket to replace and no field repair; the unit is finished.
Confirm it first. Water from a flange leak can run down the housing and drip off the bottom, making a top leak look like a bottom one. Dry everything, run water with the disposal off, then run it and watch where the first drop forms. Water at the bottom only while the motor spins, with no trace above, is the shaft seal. Repair or replace explains why replacement is cheaper, and the installation guide covers the swap.
When the leak is really the drain line
Run water with the disposal switched off and watch the trap. Water at the slip joints under the trap, at the tailpiece, or where the trap arm enters the wall is a drain leak, not a disposal leak. Those joints use washers too and loosen for the same reasons. The slow drain guide covers the trap and branch drain, and a smell at the same time usually comes from the same place.
Cabinet damage is the part people underestimate. A slow drip for weeks swells particleboard, warps the cabinet floor, and grows mold in the dark. Dry the cabinet with a fan, remove anything wet, and replace a shelf that has already swollen. Fixing the leak but leaving the wet board is how a small repair becomes a cabinet replacement.
When to call a plumber
- The flange or mounting ring is corroded solid, the sink is cracked at the drain opening, or the opening is deformed.
- The drain line is cast iron, corroded, or leaking at a joint you cannot reach.
- You have resealed the same joint twice and it still weeps.
- There is mold inside the cabinet, or water has reached the wall or floor.
- You are not comfortable supporting and disconnecting the unit.
FAQ
Can I use silicone instead of plumber's putty on the flange?
Yes, and you should on granite, quartz, or composite, where putty can stain. Silicone needs a full cure before it gets wet.
Why does it only leak when the disposal is running?
Vibration opens a joint that is only marginally tight. The usual suspects are the drain outlet slip nut and the flange bolts. Dry everything, run the unit, and watch which gets wet first.
How tight should a slip nut be?
Hand tight, then a quarter turn with pliers. If you have to lean on it, the washer is probably backwards or the pipes are misaligned, and more force will crack the nut.
Is a leak at the bottom of the housing ever worth repairing?
No. The seal is inside the motor housing, and replacing it is not a homeowner job on a sealed unit. A new disposal costs less than the labor to open the old one.
Parts and tools mentioned
Affiliate links · price ranges are approximate street prices
Sink flange and gasket kit
Fix a leak at the drain opening with a fresh flange, putty ring, and rubber gasket sized to your unit.
Disposal mounting assembly
For a leak at the mounting ring or a rusted snap ring that will no longer hold the unit tight to the sink.
InSinkErator Badger 5 (1/2 HP)
If water is coming out of the bottom of the housing, the internal seal has failed. Replacement is the practical fix.
If you buy through a link on this page, Disposal Fix Hub may earn a small commission at no extra cost to you. We link to parts and units we would use ourselves, and the repair steps above work whether or not you buy anything. Read the full disclosure.
Sources & review notes
Review focus: identify the leak location before choosing a gasket, drain fitting, mounting repair, or replacement.